What Makcu ESP32 S3 is
Makcu ESP32 S3 is a small hardware board based on ESP32-S3 that is used as an intermediate device in the input chain: mouse, board, computer. For Rust and CS2 Faceit, this option is especially interesting because it allows you to use macros in a completely safe and stable way without risk.
The most relevant connection method right now is to use the Makcu board together with an Android phone that has our macro app installed. This setup helps keep the PC completely clean: during possible checks, for example in Rust, no third-party software or mouse macros will be found on the computer. At the same time, you can keep playing comfortably without recoil.
Below we will go through what to check before buying, how to connect the board, how to flash it, and how to connect everything afterward.
Where to buy a Makcu board
In public store listings, Makcu is sold as ESP32-S3 Arduino Development Board or MAKCU Development Board. You can find it on AliExpress, Taobao, Temu, in local electronics stores, on eBay, and in specialized DMA/KMBOX shops. Prices vary a lot: some sellers list it at around 20-30 USD, while others charge more because of bundled cables, shipping, or a local warehouse.
| Where to look | What to pay attention to |
|---|---|
| AliExpress / Taobao / Temu | The most common source. Check how many USB cables are included, photos of the exact revision, reviews with real pictures, and the buyer protection period. |
| Online stores in your country | Convenient if fast delivery and a clear product page matter to you. |
| eBay and local sellers | Suitable if you need local stock. Check the listing status: some offers may already be closed, and the price can be higher than on marketplaces. |
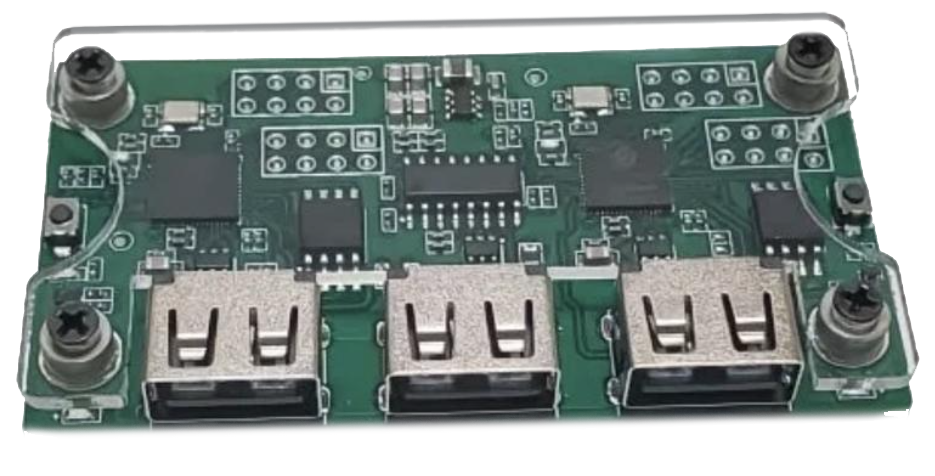
Before buying, check the following: if the kit includes only one USB-to-USB cable, you will need to buy a second identical one separately. The board must have three USB ports and two Boot buttons on the sides:
Attention: connecting to an Android phone
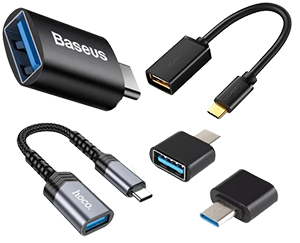
If you plan to use Makcu with an Android phone, buy a Type-C OTG to USB-A adapter in advance: the Type-C plug goes into the phone, and the USB-A port is used to connect to the Makcu board. The product title or description must explicitly mention OTG support. Options such as Adapter Philips OTG Type-C to USB 3.0 or similar models will work, but always check the description before you buy. The photo below shows an example of the correct adapter format. IMPORTANT! A regular Type-C to USB cable will not work. To connect Makcu to your phone, you must buy and use this exact type of adapter; without it, your phone will not be able to detect devices connected to it. If you are not sure whether you picked the right one, message us on Telegram.
How to flash Makcu ESP32 S3
Flashing is done through the Makcu program. The logic is simple: first put the left side of the board into Flash mode and flash it through USB1 Flash, then repeat the same process for the right side through USB3 Flash.
What to prepare before flashing
- The Makcu program. Download the Makcu program from this link - Download
- Two USB-to-USB cables. Two USB-to-USB cables are usually required for the board to work normally, so if the kit includes only one cable, buy the second one in advance.
- Install the driver. Download and install the driver from this link - Download
MAKCU firmware
- Download the program, run it as administrator, and disconnect Makcu from USB completely.
-
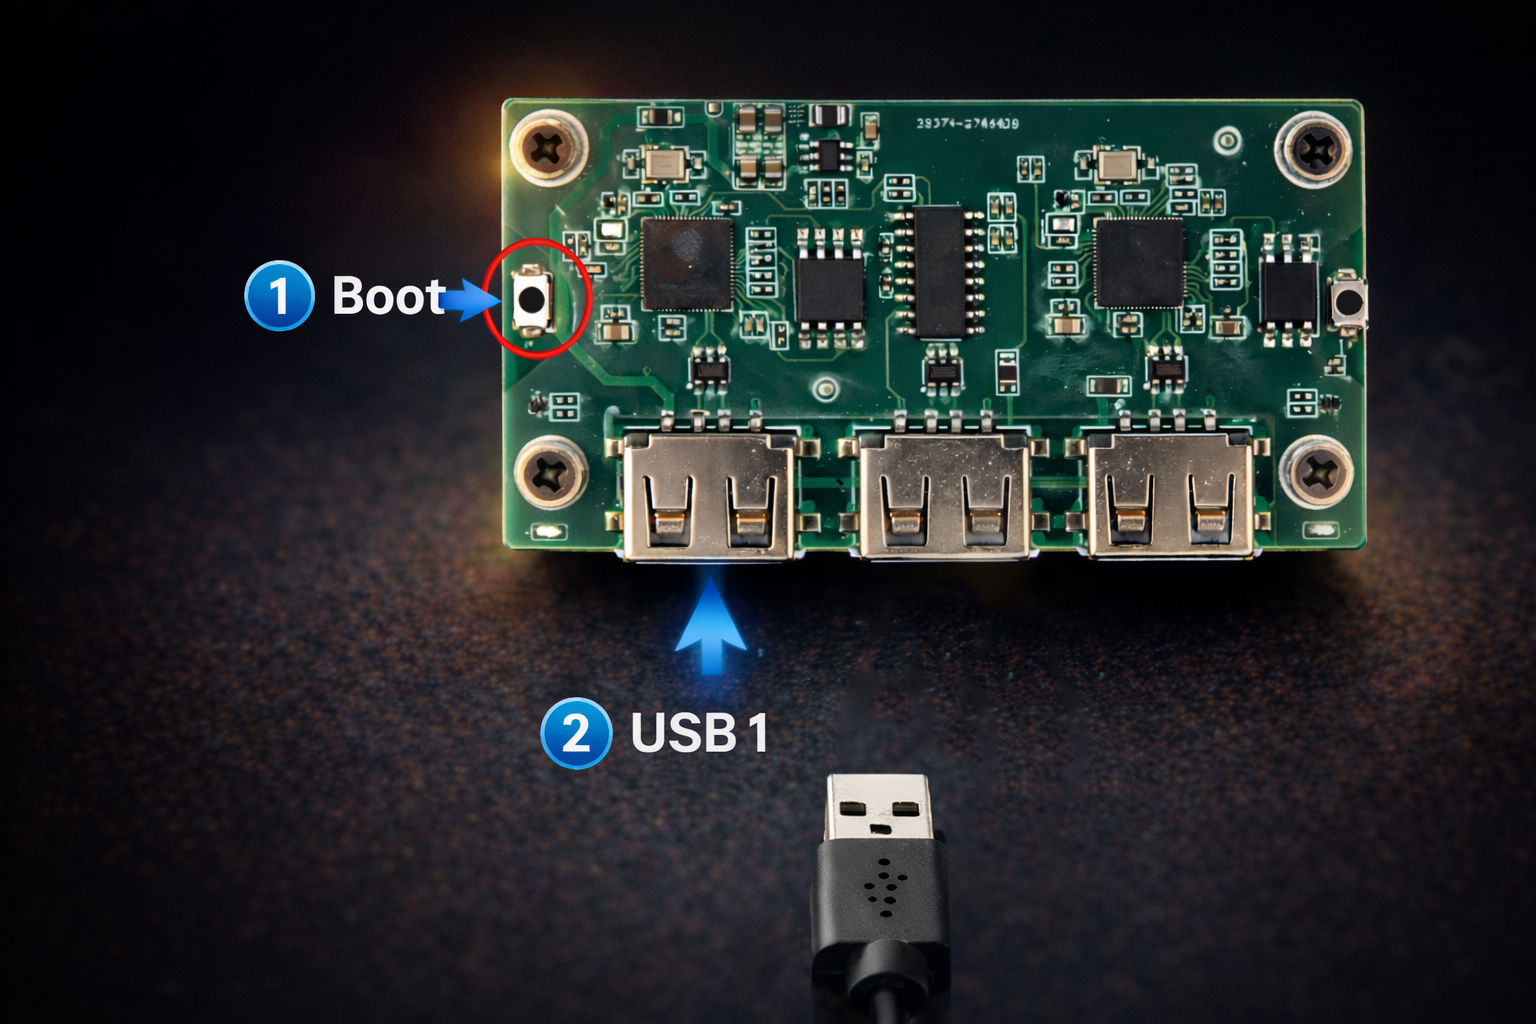
Hold the left Boot button on Makcu and, without releasing it, connect the USB cable from the PC to the left USB1 port of the board.
-
When the program detects the board in Flash mode, release the button. A connection status should appear at the top of the window, for example MAKCU Connected in Flash mode.
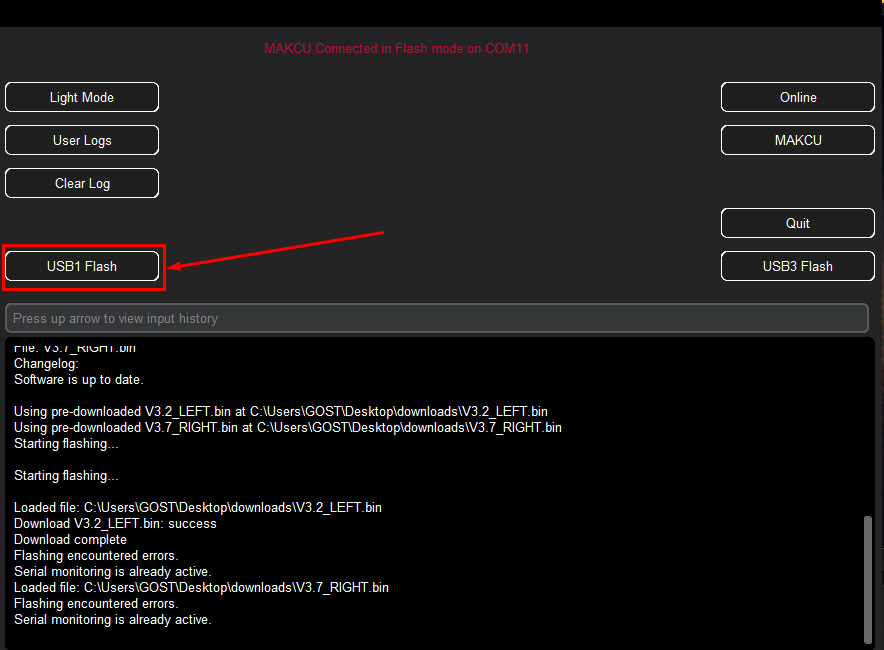
- Click USB1 Flash and wait until the left side is flashed completely.
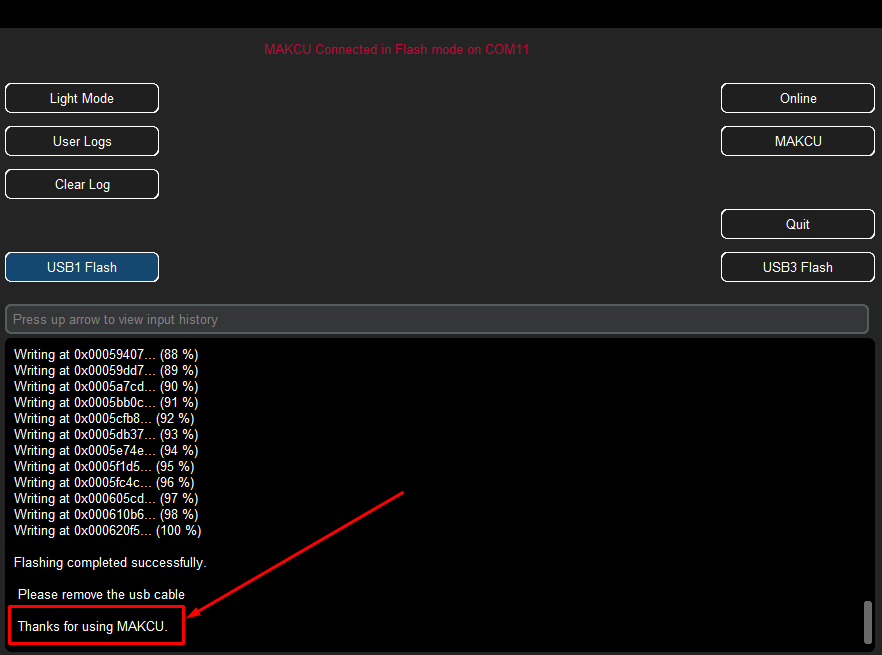
- After the firmware is written successfully, disconnect the USB cable from Makcu.
-
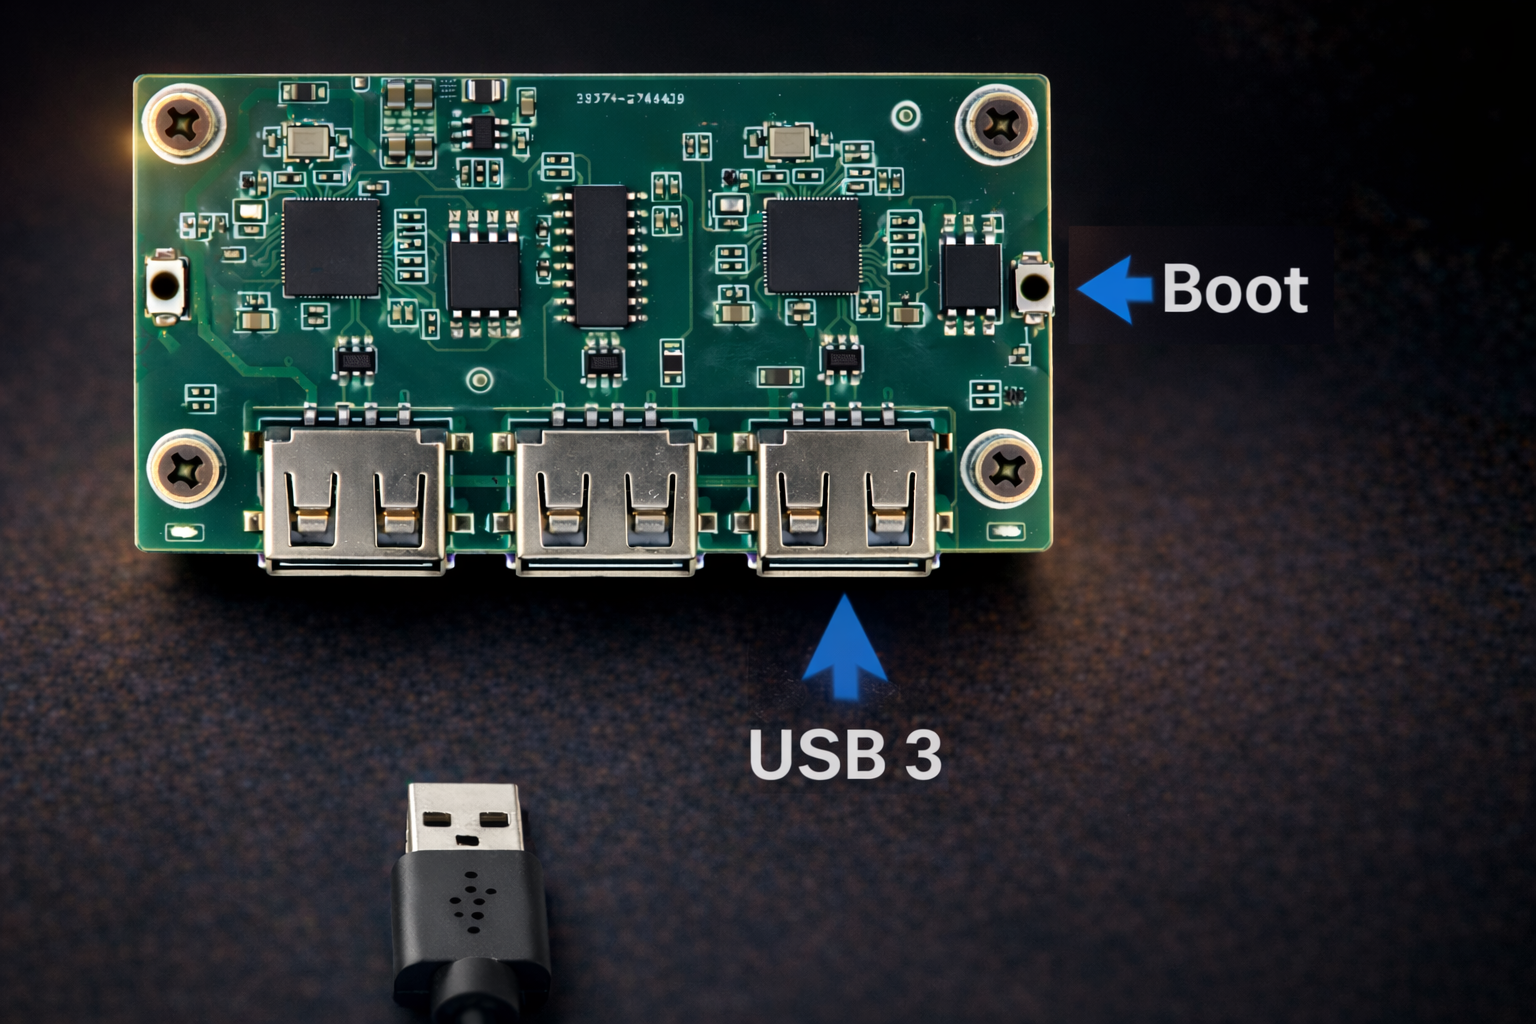
Hold the right Boot button on Makcu and, without releasing it, connect the USB cable from the PC to the right USB3 port of the board.
-
Click USB3 Flash and wait until the right side flashing process is completed.

- When it finishes, disconnect the USB cable from Makcu and connect the board using the working setup.
Important
After the flashing is complete, be sure to close the flashing program to free up the COM port.
How to understand that everything went correctly
After flashing, the program should not show a connection or writing error. If Makcu is not detected, the most common reason is that the Boot button was released too early, the wrong USB port was chosen, or a cable without data transfer support is being used. Repeat the step for the required side of the board: for the left side use the left button and the left port, and for the right side use the right button and the right port.
Connection after flashing
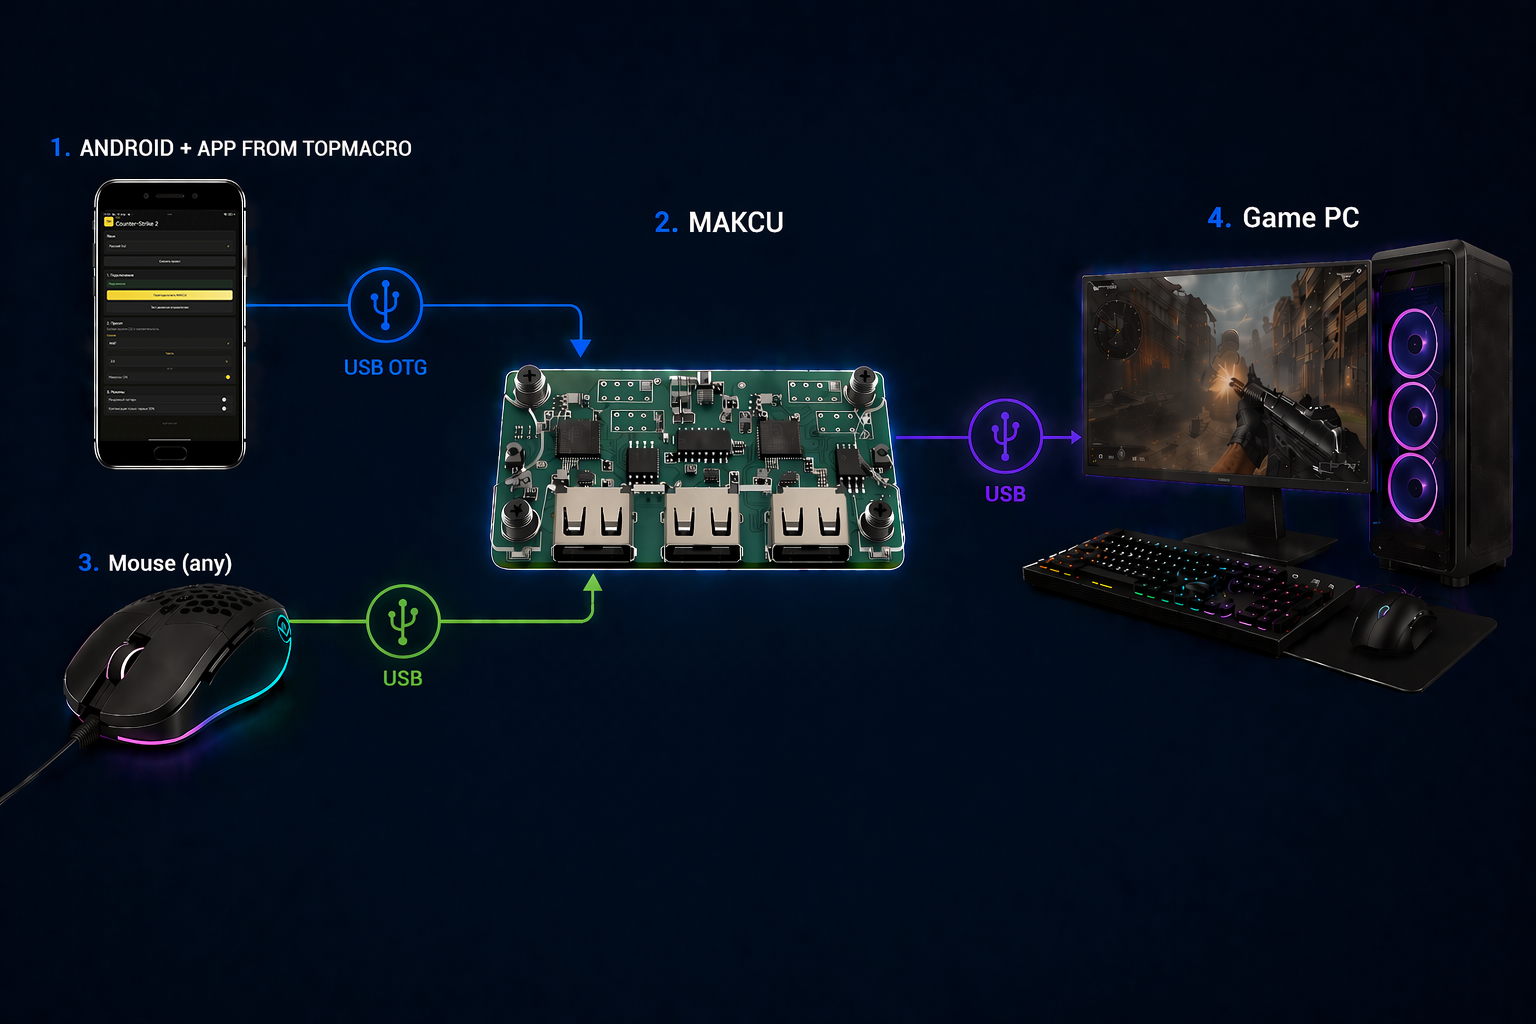
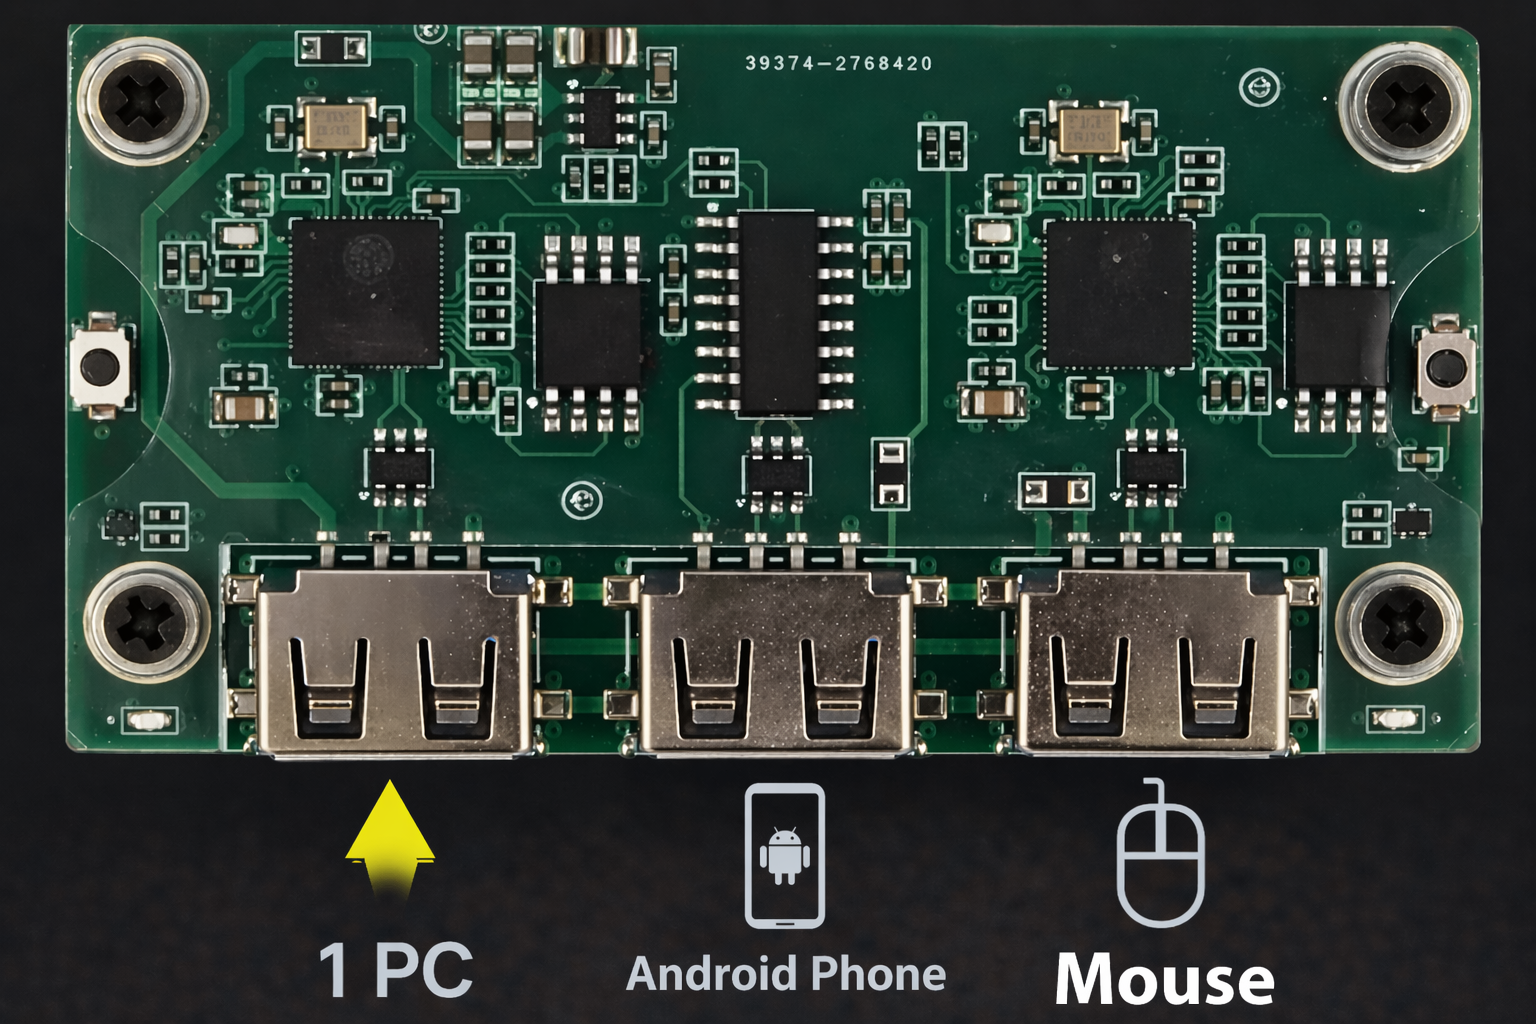
For PC + Phone
This option is suitable if the game runs on the main PC and the Android macro app runs on the phone.
- Connect the left USB port of Makcu to the main gaming PC.
- Connect the middle USB port of Makcu to the phone where our Android macro app will run.
-
Connect the mouse to the right USB port of Makcu.
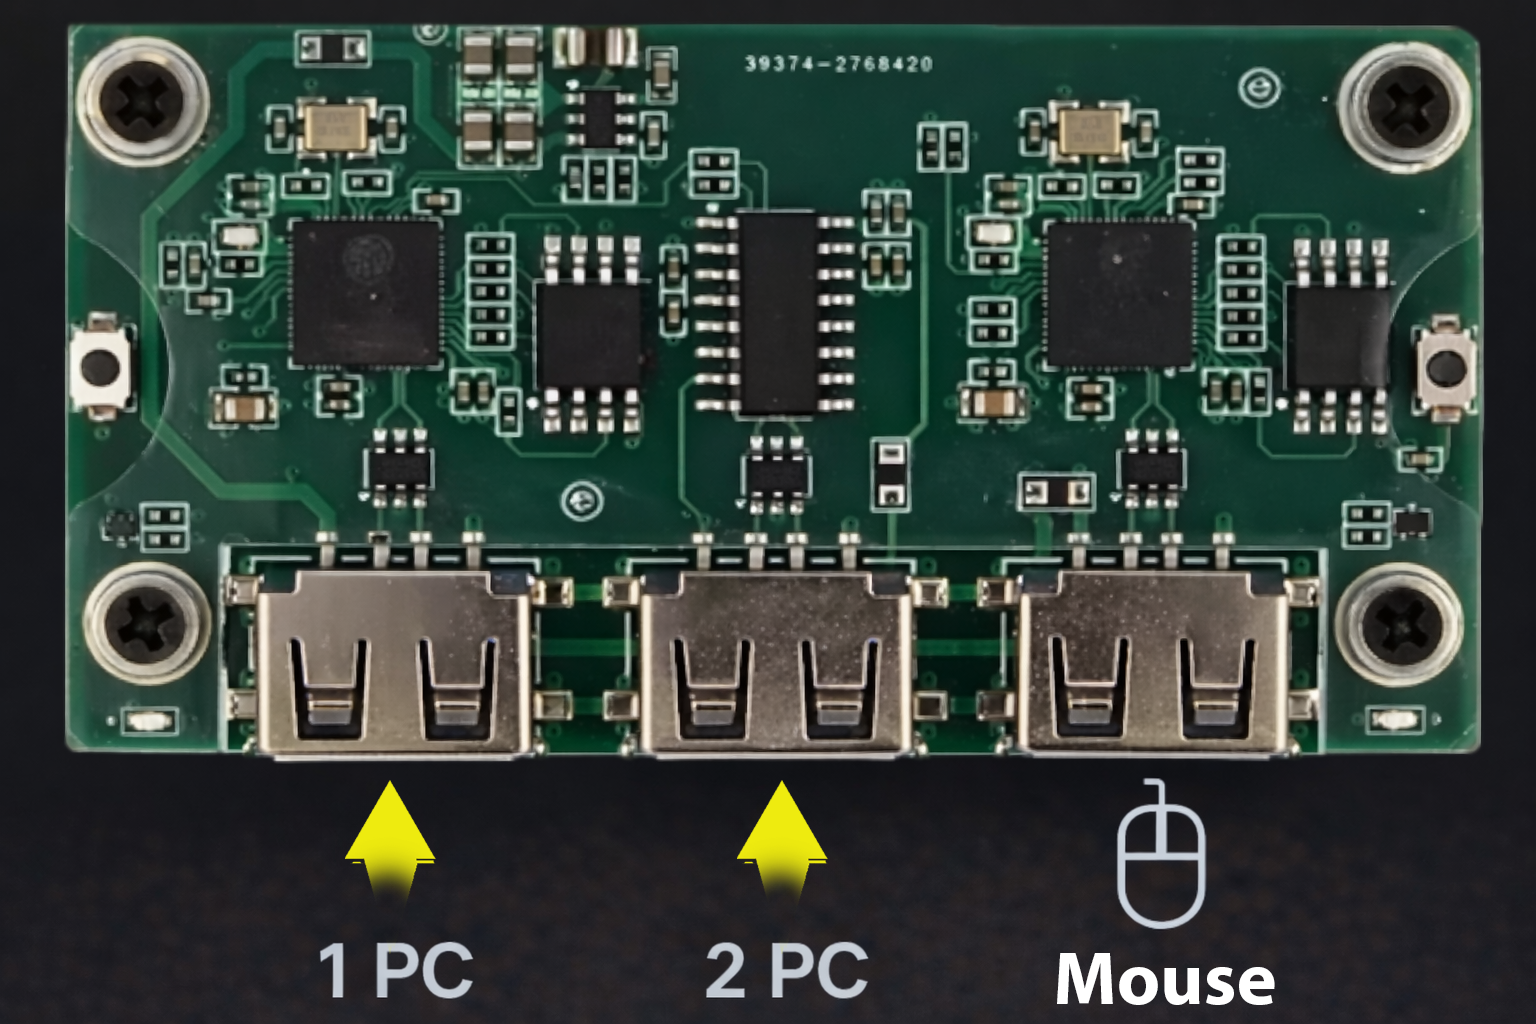
For 2 PCs
Use this setup if the game runs on one PC and the macro program runs on a second PC or laptop.
- Connect the left USB port of Makcu to the main gaming PC.
- Connect the middle USB port of Makcu to the second PC or laptop where the macro program will run.
-
Connect the mouse to the right USB port of Makcu.
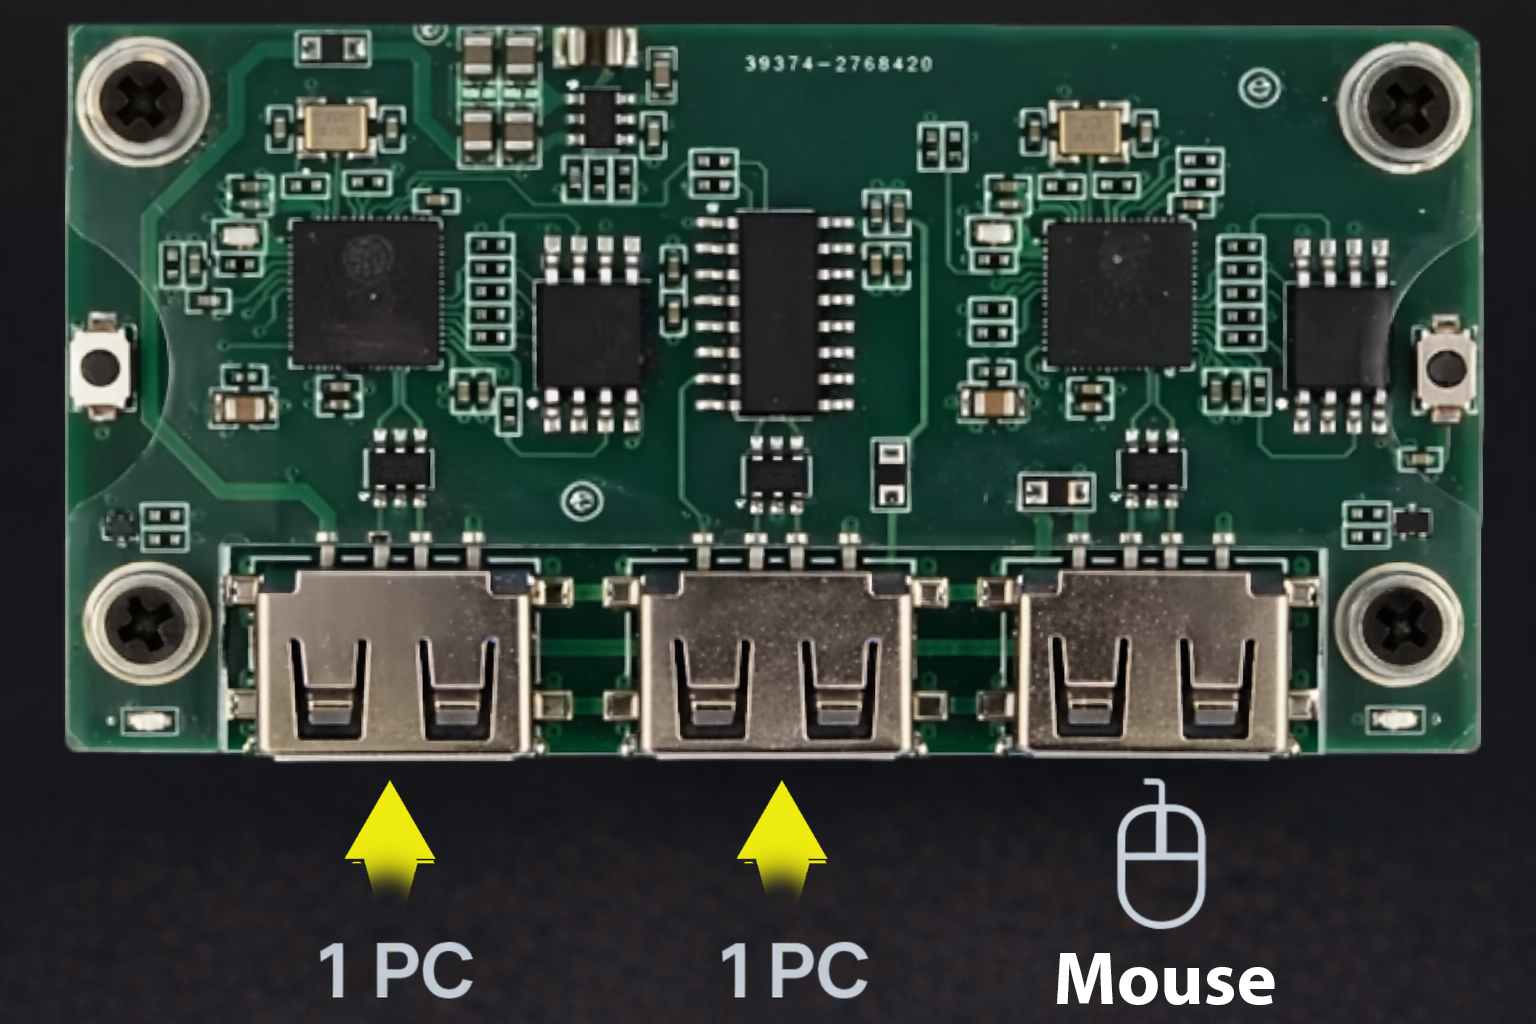
For 1 PC
This option is needed if both the game and the macro program run on the same main PC. In 1 PC mode, macros and aim assist will work in Rust and CS-Faceit, but there are risks because the program is running on the main PC.
- Connect the left USB port of Makcu to the main PC.
- Connect the middle USB port of Makcu to the same main PC with a second USB cable.
- Connect the mouse to the right USB port of Makcu.
If the mouse does not move after flashing or the software does not detect the board, first check the order of the port connections. With Makcu, not only the firmware matters, but also exactly where the left, middle, and right USB ports are connected.
Setting up macros after flashing
After successful flashing and connection using the 1 PC, 2 PCs, or PC + phone setup, register on the website in your personal account, activate your subscription, then download and run the macro program on the device connected to the Makcu USB2 slot. When you choose the input mode in the program settings, a message should appear saying that Makcu is ready.
- Check the connection. Make sure the program can see the board.
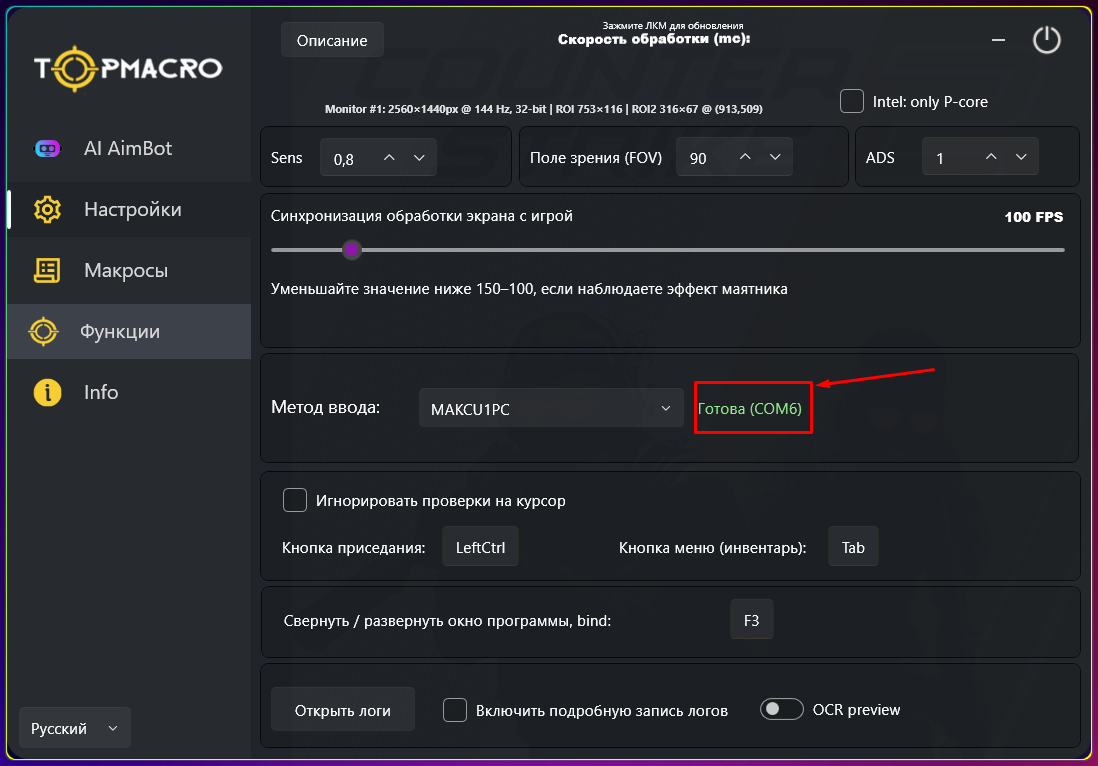
- Configure the program. Set sensitivity, FOV, and ADS so that they match your in-game settings.
- Test in training mode. Before regular play, test cursor movement as well as enabling and disabling the macro.